Radio Installation:
Removing the stock Blaupunkt radio is NOT easy..
Tools Used:
- Metra 86-9001 Audi/VW/Mercedes Stock Radio Removal Tool
- Soldering Iron
- Electric Black Tape
- Knife
Products Used:
- AudioPipe BT-200P - Gold Plated Positive Battery Terminal
- AudioPipe BT-200N - Gold Plated Negative Battery Terminal
- Pioneer DEH-P9400MP - CD/CDRW/MP3 Player with integrated full Equalizer
- Metra 99-9100 Radio Dash Trim
- Metra 40-VW10 Radio Antenna Adaptor
- Metra 70-1784 Radio Harness Connector
|
|
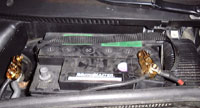
Disconnect the negative battery terminal to prevent an accidental short circuit. We used the
opportunity to change the factory battery terminal connectors.
|
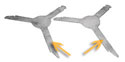 Insert the long ends of Metra's 86-9001 into the slots in the factory head unit until it clicks
and pull the unit out. Although it sounds easy, it's quite difficult to find the right spot in
the slot. Be careful not to cut yourself on the sharp edges of the Metra tool. The radio is
held in place by a spring clip at the bottom of each side. Angle the tool so that as you
insert it, it travels outward. Once it is in about an inch or two, straighten the tool...
you're trying to catch the outside of the spring clip and pull it inward, so that it clears
the frame and allows the radio to be pulled forward. The radio will slide forward when both
clips are held inward.
Insert the long ends of Metra's 86-9001 into the slots in the factory head unit until it clicks
and pull the unit out. Although it sounds easy, it's quite difficult to find the right spot in
the slot. Be careful not to cut yourself on the sharp edges of the Metra tool. The radio is
held in place by a spring clip at the bottom of each side. Angle the tool so that as you
insert it, it travels outward. Once it is in about an inch or two, straighten the tool...
you're trying to catch the outside of the spring clip and pull it inward, so that it clears
the frame and allows the radio to be pulled forward. The radio will slide forward when both
clips are held inward.
Once the radio removed, disconnect the wiring.
|
|
|
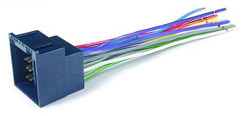
Solder the corresponsing wires of the aftermarket radio harness (supplied with the radio) and
the Metra 70-1784 Radio Harness Connector. Some choose to slice into the factory harness, but
little time is saved and if the radio is ever changed, the stock harness is always intact.Make
sure you wrap each individual soldered connection properly, then wrap all the wires together
in a bundle.
Connect the custom harness to the stock harness.
|
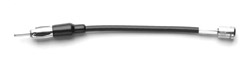
Connect the Metra Radio Antenna Adaptor to the stock antenna connector.
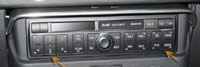
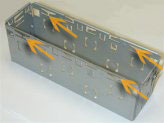
Slide the DIN cage (supplied with aftermarket radio) into the radio opening and secure by bending the metal locking tabs down.
Slide the aftermarket head unit into the DIN cage until secure.
|
|
|
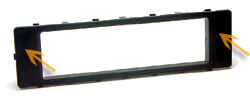
Re-connect the battery terminal and test the unit for proper operation. Snap the Matra Radio
Dash Trim into the radio opening. Unlike most Metra products, this one doesn't fit properly.
Use a knife to trim off the large inserts in the back of the trim.
|
|
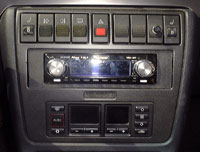
We chose to pass the three pairs of RCA cables and remote wire, connecting them to the new
headunit before placing everything for good. Final result.
|
|
|